
This post will form part of a Cilium series, and first we will take a look at their NetworkPolicies.
In an age where cloud-native environments have become the norm, the intricate web of networking and security presents both challenges and opportunities. One technology that has emerged as a game-changer in this space is Cilium. Cilium is an open-source project designed to provide networking, security, and observability for cloud-native environments such as Kubernetes clusters and other container orchestration platforms.
Cilium is marketed as a CNI (container networking interface), but it’s more than that. Cilium is like the Swiss Army knife of container networking interfaces. It’s not just a CNI, it’s a whole toolbox filled with all the tools you need.
The first CNI I started using was installed by default for me when I bootstrapped a cluster with kubeadm. I wanted to use NetworkPolicies, and of course, your CNI needs to support it, unfortunately, Flannel doesn’t.
Snippet from the Flannel github README.
“Flannel is responsible for providing a layer 3 IPv4 network between multiple nodes in a cluster. Flannel does not control how containers are networked to the host, only how the traffic is transported between hosts. However, flannel does provide a CNI plugin for Kubernetes and a guidance on integrating with Docker. Flannel is focused on networking. For network policy, other projects such as Calico can be used.”
So yes, as suggested, I opted for Calico instead. I have personally and professionally only used Calico, until now. It does seem to be the most popular as well as the default CNI for most cloud providers. Enter Cilium… I’ve known about it for a while, but I’ve always thought, “Meh, the CNI I’ve got is working, so why bother?”. You just need IPAM for your pods and basic networking, so if your pods can communicate you’re golden. And as a final requirement, it must support NetworkPolicies, right? Well, then you start looking at what else you get with Cilium CNI.
- Cilium Network Policies: This will be the focus of this blog. These policies extend the control you have over your traffic. More on this further in this post.
- Hubble (UI & CLI): A user interface that provides deep visibility into the communication and behaviour of services as well as the networking infrastructure in a completely transparent manner. We’ll be utilizing both in this post.
- kube-proxy replacement: Cilium provides an extremely efficient data plane, which is particularly useful at scale. The standard kube-proxy is based on iptables – which was never designed with the churn and the scale of large Kubernetes clusters. Cilium’s eBPF-based kube-proxy replacement can significantly improve performance and reduce latency.
- multi-cluster capabilities (also known as cluster-mesh): I think this could be a blog series of its own, I’m super excited to take a look at this in the coming months. What cluster-mesh allows, is to connect the networks of multiple Kubernetes clusters in such a way that pods in each cluster can discover and access services in all other clusters of the mesh. This effectively joins multiple clusters into a large unified network, regardless of the Kubernetes distribution or location each of them is running. Essentially, if podA in clusterA needs to call an endpoint on podB in clusterB, we don’t have to call it via the ingress of clusterB.
Cilium Network Policies vs vanilla Kubernetes Network Policies
Let’s dive into the differences and capabilities of Cilium Network Policies compared to vanilla Kubernetes Network Policies.
Kubernetes Network Policies are the basic form of network security in a Kubernetes environment. They control the traffic between pods and network endpoints within a Kubernetes cluster.
Cilium Network Policies, on the other hand, are an extension of Kubernetes Network Policies that provide additional capabilities. They are available as a CustomResourceDefinition (CRD) which supports the specification of policies at Layers 3-7 for both ingress and egress. Sounds cool right?
Here are some key differences and features that Cilium Network Policies offer over vanilla Kubernetes Network Policies:
- Layer 7 Visibility and Control: While Kubernetes Network Policies operate at Layer 3 (IP address) and Layer 4 (ports), Cilium Network Policies extend this by providing visibility and control up to Layer 7 (application layer). This includes HTTP, gRPC, and Kafka-aware filtering, which allows you to apply policies based on HTTP method, path, or Kafka API.
- API-Aware Network Security: Cilium Network Policies allow you to define granular access controls based on individual API calls within your microservices.
- DNS-based Egress Policies: Cilium Network Policies allow you to define egress policies based on DNS names, making it possible to control egress access without knowing the IP addresses of the destination.
- Identity-Based Security: Cilium uses Security Identity, derived from the Kubernetes service account, to define network policies, which is more secure and flexible than using IP addresses.
- Cluster-wide Policies: Cilium provides CiliumClusterwideNetworkPolicy, a cluster-scoped variant of the CiliumNetworkPolicy. It allows you to define policies that have a cluster-wide scope.
Deep Dive - Layer7 Visibility
In this post we will be taking a closer look at the L7 visibility that Cilium network policies provide. To set the scene, we have a single 3 node cluster running, with Cilium CNI (v 1.14.4) running, with envoy proxy and Cilium ingress controller enabled. This was installed with Helm. Here are the values I used:
cluster:
  name: kubernetes
envoy:
  enabled: true
hubble:
  relay:
    enabled: true
  ui:
    enabled: true
ingressController:
  enabled: true
  loadbalancerMode: shared
operator:
  replicas: 1
serviceAccounts:
  cilium:
    name: cilium
  operator:
    name: cilium-operator
tunnel: vxlan
The ingress controller component is unnecessary for what we’re doing with layer7. We can double check the status of the CNI with a cilium cli tool.
> cilium status
    /¯¯\
 /¯¯\__/¯¯\    Cilium:         OK
 \__/¯¯\__/    Operator:       OK
 /¯¯\__/¯¯\    Hubble:         OK
 \__/¯¯\__/    ClusterMesh:    disabled
    \__/

DaemonSet         cilium             Desired: 3, Ready: 3/3, Available: 3/3
Deployment        cilium-operator    Desired: 1, Ready: 1/1, Available: 1/1
Deployment        hubble-relay       Desired: 1, Ready: 1/1, Available: 1/1
Deployment        hubble-ui          Desired: 1, Ready: 1/1, Available: 1/1
Containers:       cilium             Running: 3
                  cilium-operator    Running: 1
                  hubble-relay       Running: 1
                  hubble-ui          Running: 1
Cluster Pods:     15/18 managed by Cilium
Image versions    cilium-operator    quay.io/cilium/operator-generic:v1.14.2@sha256:52f70250dea22e506959439a7c4ea31b10fe8375db62f5c27ab746e3a2af866d: 1
                  hubble-relay       quay.io/cilium/hubble-relay:v1.14.2@sha256:a89030b31f333e8fb1c10d2473250399a1a537c27d022cd8becc1a65d1bef1d6: 1
                  hubble-ui          quay.io/cilium/hubble-ui-backend:v0.12.0@sha256:8a79a1aad4fc9c2aa2b3e4379af0af872a89fcec9d99e117188190671c66fc2e: 1
                  hubble-ui          quay.io/cilium/hubble-ui:v0.12.0@sha256:1c876cfa1d5e35bc91e1025c9314f922041592a88b03313c22c1f97a5d2ba88f: 1
                  cilium             quay.io/cilium/cilium:v1.14.2@sha256:6263f3a3d5d63b267b538298dbeb5ae87da3efacf09a2c620446c873ba807d35: 3
With our cluster up and running, I deployed a test application in its own namespace so we can get some traffic going. The application has a voting-bot pod, which generates some traffic - it does some calls periodically to the web service.
> kubectl get pod -n emojivoto
NAME                        READY   STATUS    RESTARTS   AGE
emoji-785d9d9cdf-w76fr      1/1     Running   0          66m
vote-bot-857cdd59c8-t9bft   1/1     Running   0          66m
voting-5bb775ddb-6jhdj      1/1     Running   0          66m
web-6657bbcdbd-wjzs6        1/1     Running   0          66m
You’ll notice in the values file that I enabled Hubble UI (hubble.ui.enabled=true). We can access the Hubble UI by executing port-forward to the hubble-ui service running in the kube-system namespace. Alternatively, we can create an ingress if we so choose.
> kubectl port-forward svc/hubble-ui 8888:80 -n kube-system
We can now navigate to localhost:8888 in our favourite browser.
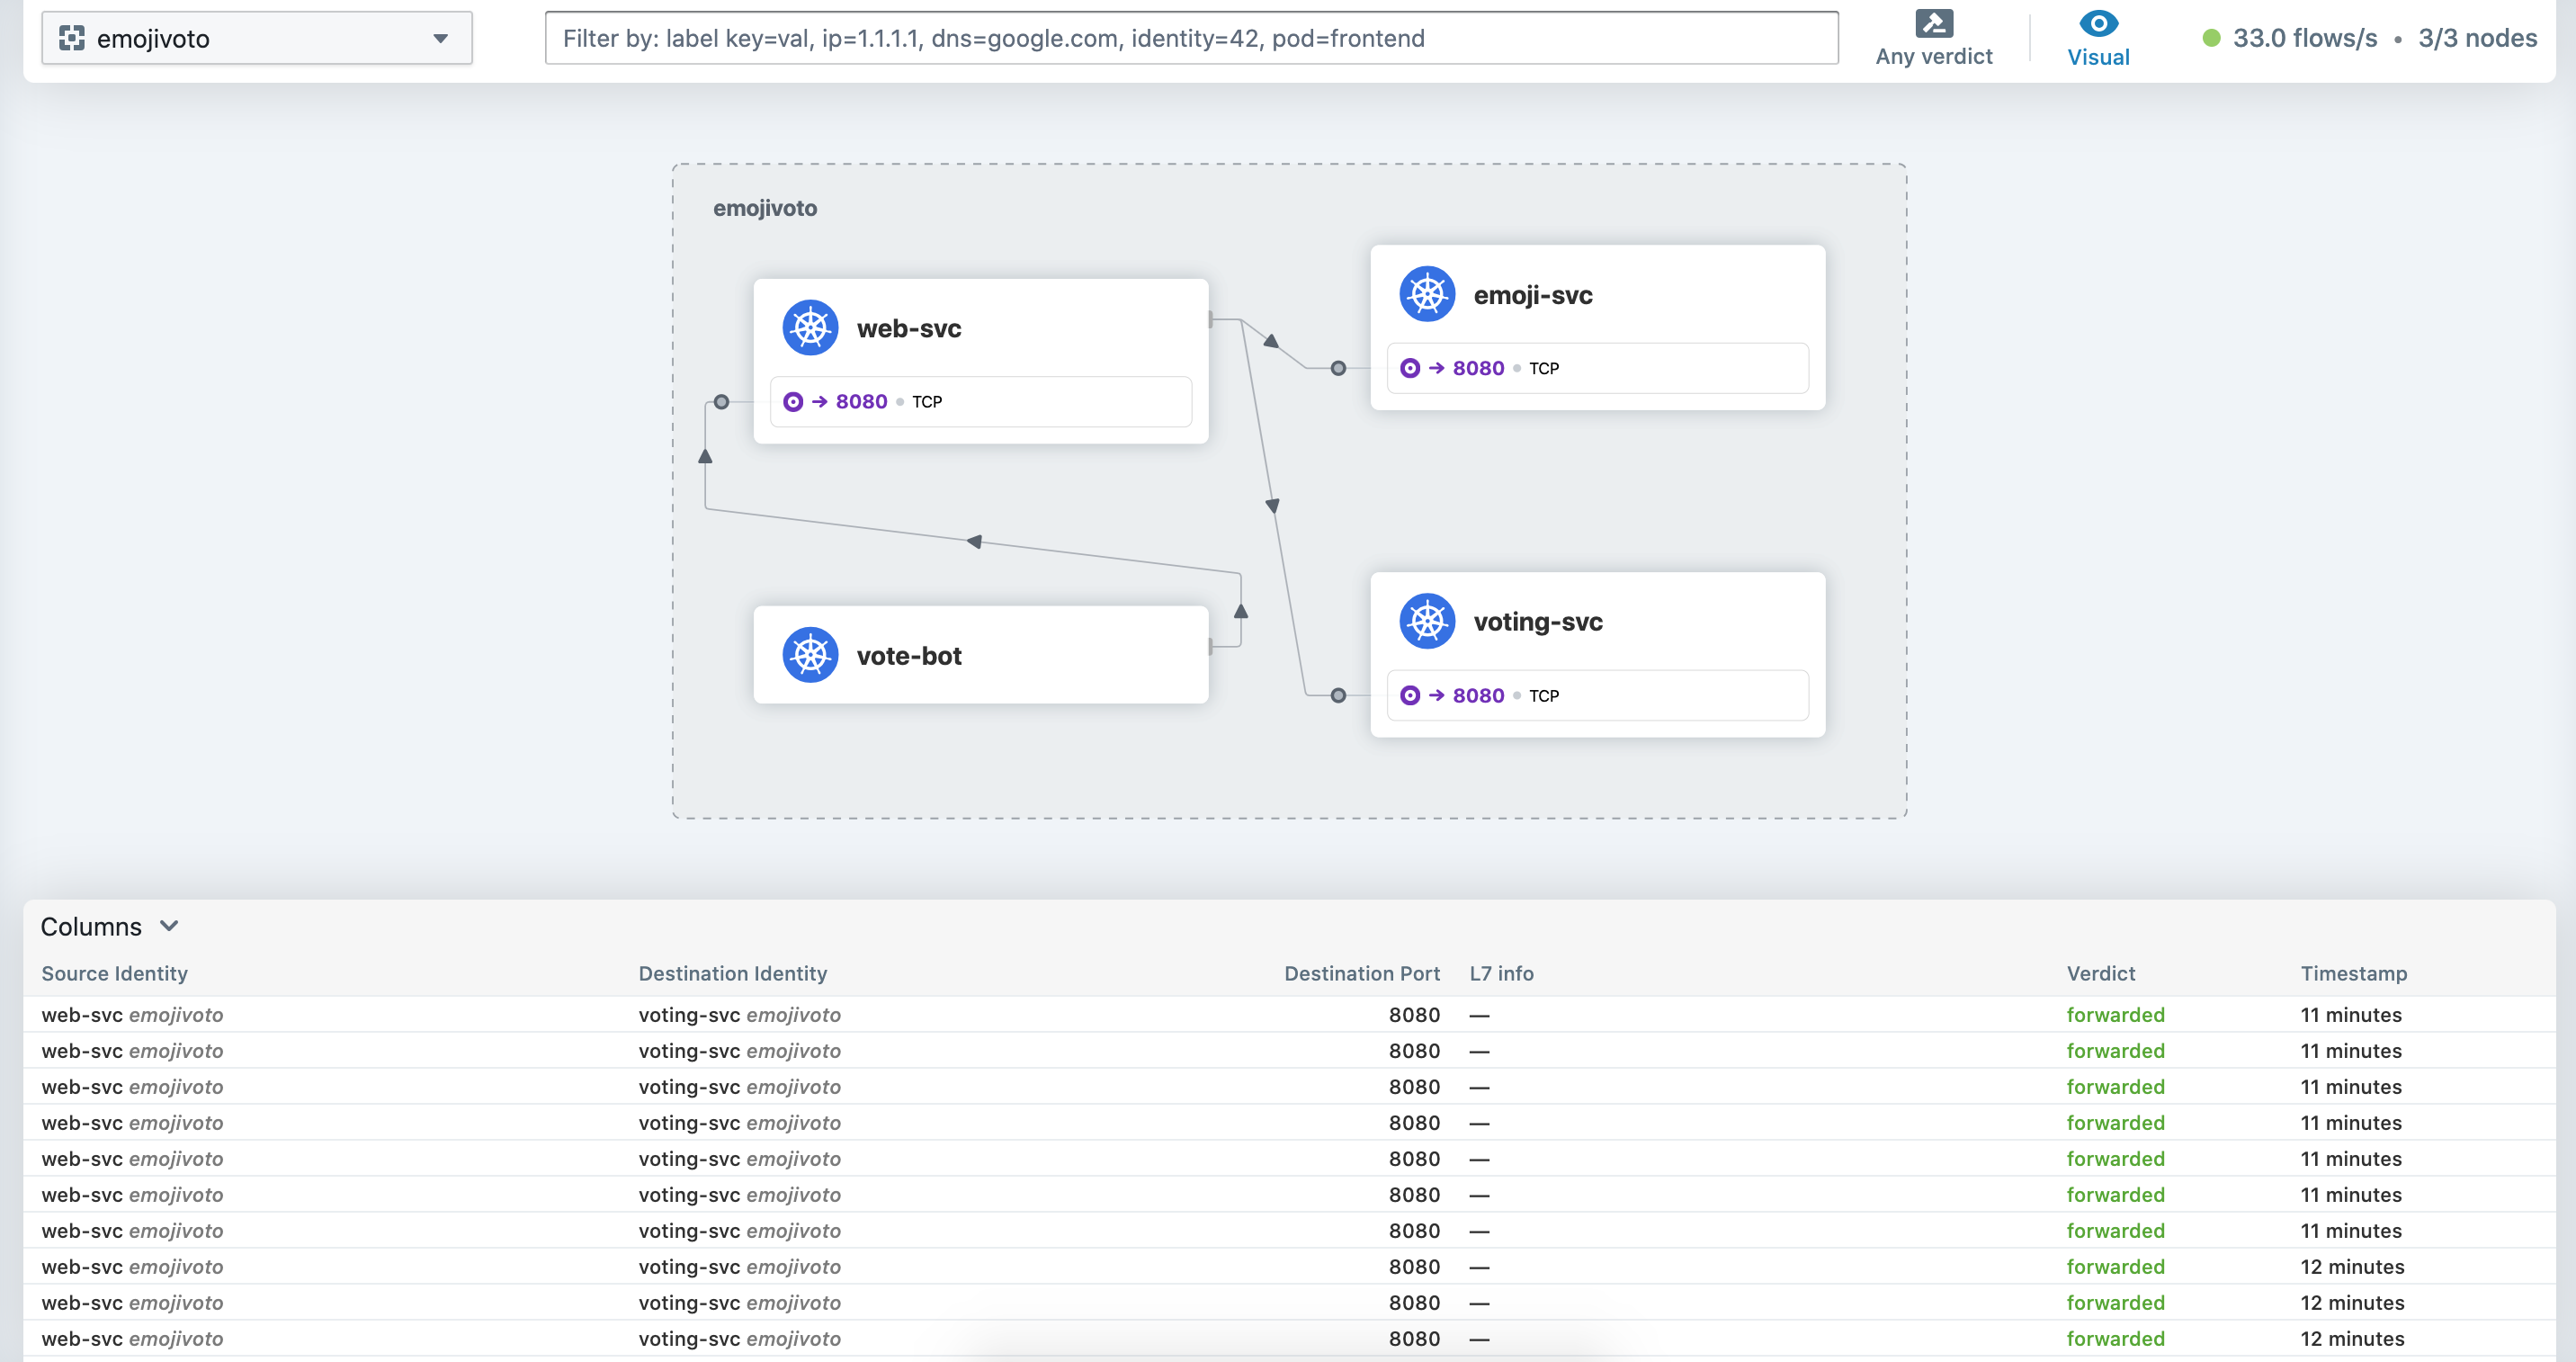
That “L7 info” column is what we’re needing to populate. We can do that with a CiliumNetworkPolicy object. Here’s what I have:
apiVersion: cilium.io/v2
kind: CiliumNetworkPolicy
metadata:
  name: l7-visibility
  namespace: emojivoto
spec:
  egress:
  - toPorts:
    - ports:
      - port: "53"
        protocol: ANY
      rules:
        dns:
        - matchPattern: '*'
  - toEndpoints:
    - matchLabels:
        k8s:io.kubernetes.pod.namespace: emojivoto
    toPorts:
    - ports:
      - port: "80"
        protocol: TCP
      - port: "8080"
        protocol: TCP
      - port: "8081"
        protocol: TCP
      rules:
        http:
        - {}
  endpointSelector:
    matchLabels:
      k8s:io.kubernetes.pod.namespace: emojivoto
The above policy will tell Cilium to intercept all TCP and UDP port 53, TCP port 80 and TCP port 8080, and TCP port 8081 egress traffic from all the pods in the emojivoto namespace and redirect it to the envoy proxy (part of Cilium).
It’s important to know that L7 network policies not only enable visibility but also restrict what traffic is allowed to flow in and out of a Pod, so me naming the policy L7-visibility is somewhat misleading. But what makes the Hubble application so useful, is the fact that you’ll be able to see what traffic is being dropped and adjust your policy accordingly. A feature, I’ve always known to be available only with a service mesh. Although a similar concept, a proxy (sidecar in the case of a service mesh) that inspects the traffic and reports on it. Cilium’s implementation of it, is way more lightweight, in my opinion.
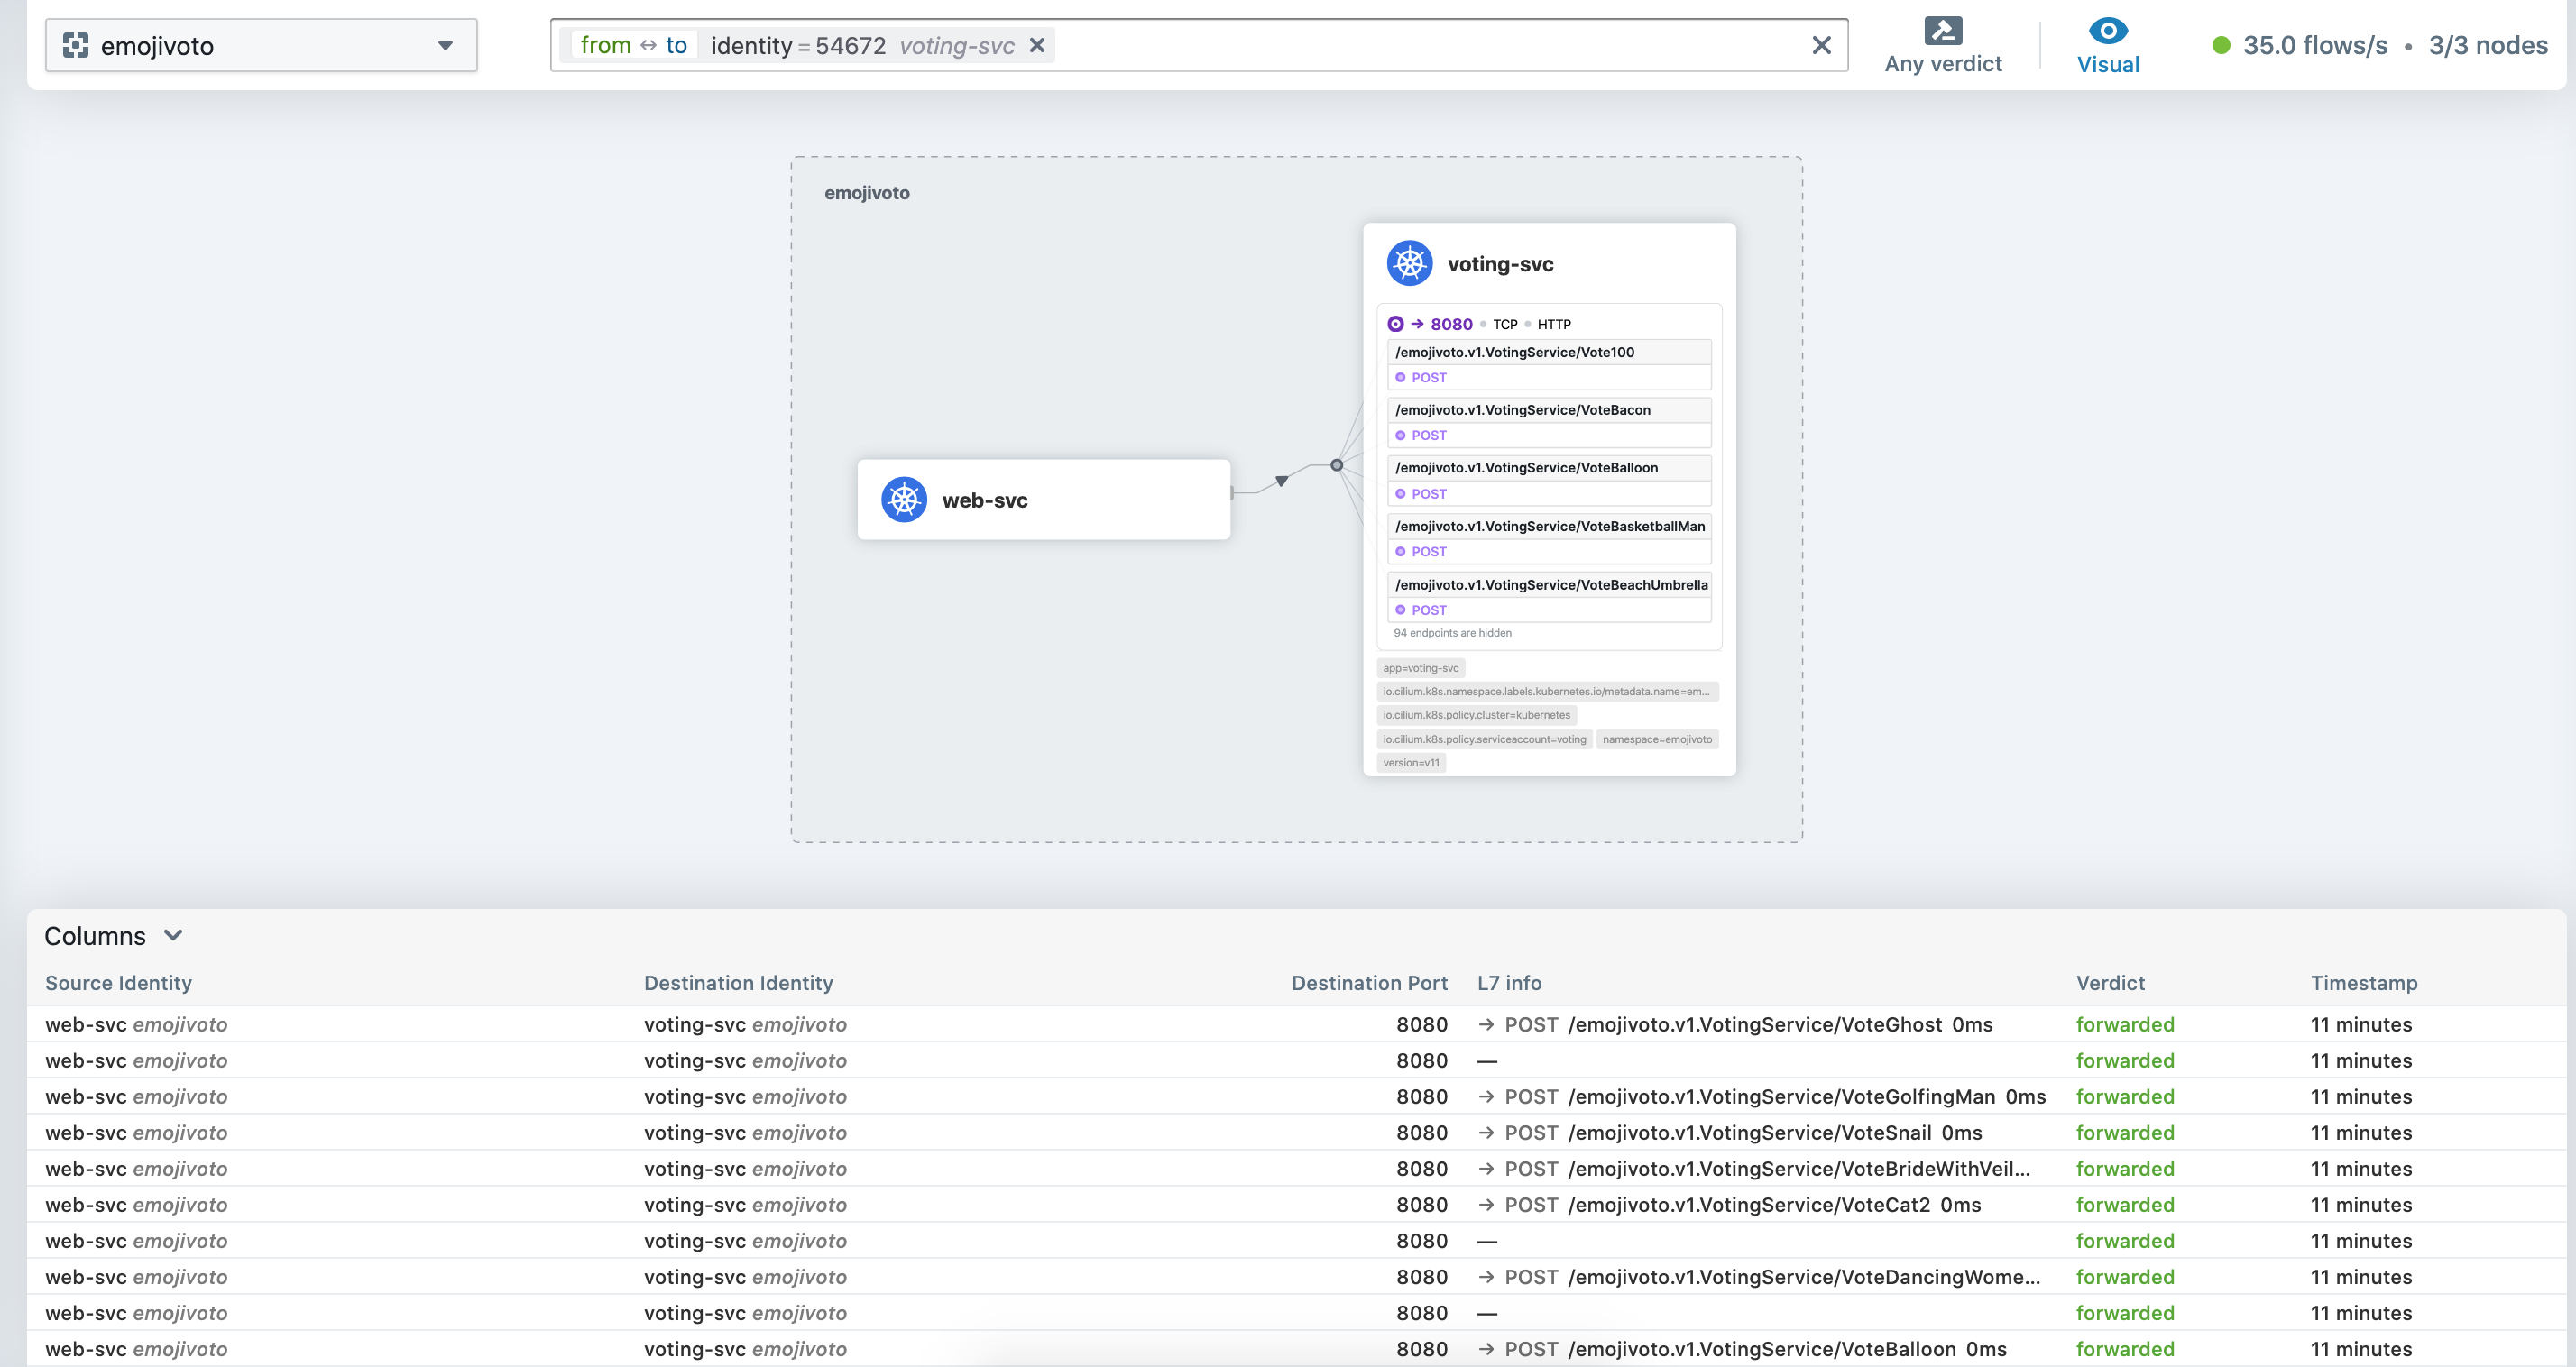
With the Layer7-Visibility policy applied. We can return to the Hubble-UI:

Awesome… We can now have the visibility of the calls being made between the pods. And clicking on a specific service (i.e. the web-svc) we can see the recent calls that the web service made towards the voting service.
Security Concerns of monitoring L7 traffic
Monitoring the 7th layer of network traffic requires special attention to security, as it can contain sensitive data such as usernames, passwords, query parameters, API keys, and more.
To enhance security, Cilium offers the --hubble-redact-enabled option. This option allows Hubble, a component of Cilium, to handle sensitive information that may be present in Layer 7 flows.
In more detail, Hubble can redact certain information for supported Layer 7 protocols. For instance, for HTTP, it can redact URL query parameters (GET requests) and URL user info (like passwords used in basic authentication). It can also redact HTTP headers, except for those defined in a specific list or only those defined in another list.
This feature is part of Cilium’s broader aim to provide security visibility and enforcement, based on service, pod, or container identity, rather than IP address identification. This allows for stronger security isolation, especially in dynamic environments like microservices architectures.
Conclusion
In conclusion, while Kubernetes Network Policies provide basic network security capabilities, Cilium Network Policies extend these capabilities to provide highly flexible and granular control over your network traffic, adding an extra layer of security in your Kubernetes environment.
This was just one piece of the puzzle, in this series we will take a closer look at why Cilium is a must have in your Kubernetes security toolbox.